How to fix a leaking SF100 or SF220 shower filter
A leaking shower filter is almost always caused by a washer that has shifted, is seated incorrectly, or is missing from one of the connection points. There are three possible locations for a leak in a standard SF100 or SF220 installation:
- The connection between the shower arm and the shower filter (top connection)
- The centre seam of the shower filter body itself
- The connection between the shower filter and your shower head or mount (bottom connection)
Start by identifying which of these three points is leaking, then follow the relevant steps below.
Leak at the top — between the shower arm and the shower filter
This type of leak is often caused by over-tightening the filter onto the shower arm, which pushes the washer up into the shower arm itself and breaks the seal.
To fix: remove the shower filter from the shower arm and look inside the shower arm — the washer may be sitting inside it rather than in the filter connection. If it is, retrieve it and reseat it flat inside the top connection of the shower filter. Reattach the filter hand-tight and test.
If the washer was already correctly positioned but the leak continues: remove the washer, flip it over so the other face is forward, and reseat. If you still see a drip, wrap 3–4 layers of plumber's tape around the shower arm threads before reattaching. This should eliminate the leak entirely.
A leak from the middle of the filter body is usually caused by the internal washers/gaskets shifting out of position when the cartridge was last changed or when the filter was handled. There are three large washers inside the filter: two at either end of the cartridge cavity and one near the centre.
To fix:
- Unscrew the shower head or mount and remove the filter from the shower arm.
- Open the filter casing and remove the cartridge.
- Locate all three washers. They may have shifted toward the middle or compressed unevenly.
- Remove all three washers and wipe them clean. Use a ballpoint pen (never anything with a sharp point) to push them free if needed.
- Wipe out the inside of the filter housing with a cloth or rinse with clean water to remove any debris.
- Reseat all three washers in their correct positions, replace the cartridge, and close the filter.
- Reinstall and test. The leak should be gone.
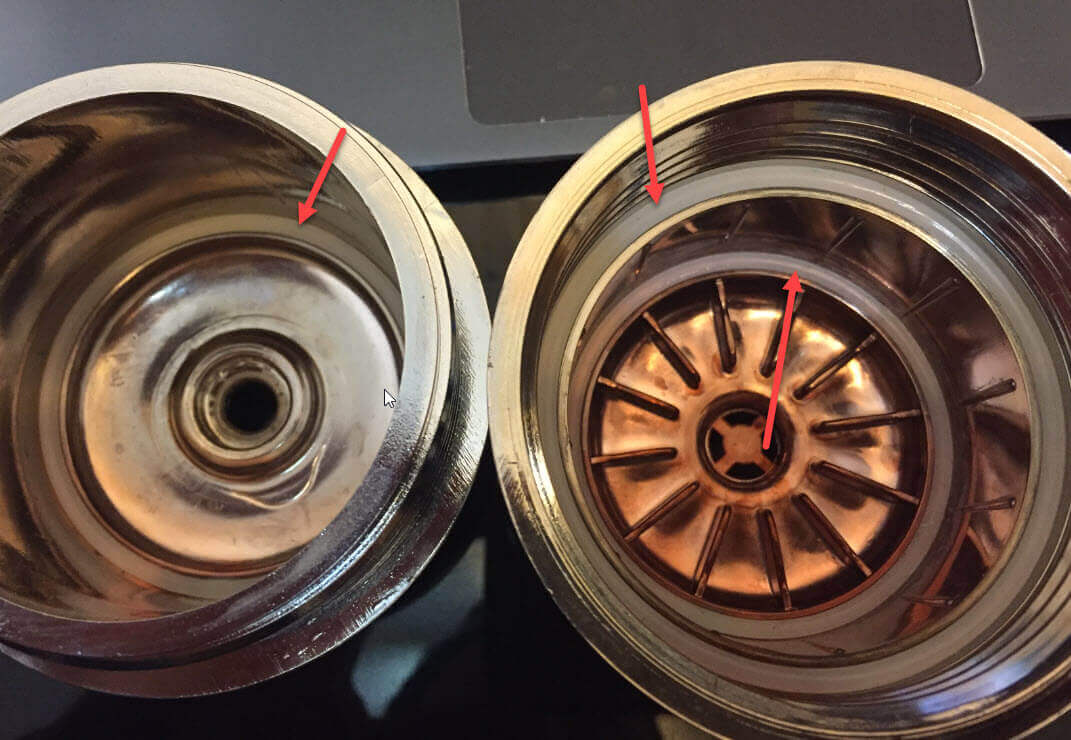
The correct positions of the washer are:
This is the most common leak point, and it's almost always caused by using two washers in the connection (one too many), or by a washer that isn't sitting flat.
To fix:
- Unscrew the shower head or mount from the bottom of the filter.
- Check that there is only ONE washer in this connection. If there are two, remove one — two washers in the same connection will never seal properly as they can shift against each other.
- Check the remaining washer: it should be sitting flat with an even, smooth surface. If the surface is uneven or the washer has shifted, reseat it.
- If the leak continues after reseating, flip the washer over and try again.
- For any remaining small drip, wrap 3–4 layers of plumber's tape around the bottom threads of the filter and reattach the shower head or mount.